I finally got around to changing it up for spring (don't judge…I'm a busy lady, ya know!)
Well here's what I've changed up and a tutorial on these adorable spring flowers.
Spring Flowers
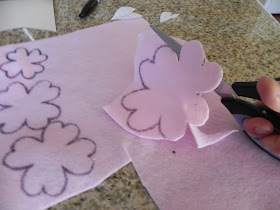
The first thing you want to do is make a flower pattern. I just cut out 3 hearts (small, medium, and large) for my petals. Traced them onto a piece of construction paper and snipped away.
Your flowers don't have to be perfect (obviously).
Next, trace your pattern onto your felt. And do some more snipping.
Make sure that you cut inside your line. You don't want any marker on the edge of your flower. Especially is you are using a light color felt.
Next you want to sew your petals together. You take one of the "hearts", pinch it together and sew a few little stitches at the bottom of the petal. Make sure it's secure, or it will pull apart easily.
Repeat this step will all of your petals.
This takes forever. Be warned. You'll need patience to make this flower!
This is what your three layers should look like. Your's will vary depending on where you add your little stitch to the petal. The lower you stitch to the center the more open your flower will appear. Mine looks pretty closed in this particular flower.
Stack your layers together and stitch together through the center.
I then made a leaf using the same large flower pattern. And just added it to the bottom of the flower. It's done the same way as the flowers are done.
To make the center of my flower I used embroidery floss.
I wrapped it around a fork 5-6 times, tied it together in the center. Pulled it off of the fork and snipped the loops.
Pinch together and use hot glue to stick that little guy in.
Voila!
Your flower!
Be creative with your colors. It's really fun to play around with different colors and patterns.
My last step to complete my flower was to glue the top half of a square of velcro to the back of my flower. Then I can add it to my wreath!
So here's my new wreath.
I added these numbers using a hot glue gun. And I used a lot of glue to make them very secure.
They are just unfinished wood numbers from Hobby Lobby. I painted them, let them dry, and added them to the wreath.
I sure do like this! And I love the versatility the velcro gives me.
A wreath for every season!


I love these flowers! I need to make some. Your idea to have a velcro wreath is brillant! Thanks for linking up to Sunday Round Up. I am following your blog now. :)
ReplyDeletexoxo
Heather
Www.heatherlyloves.com
Love this project!!!!
ReplyDeleteI currently have a Craft, Create and Inspire linky party going on...
I would love you to link up this project :)
http://polkadot-pretties.blogspot.co.uk/2012/04/you-inspire-linky-party_14.html
Claire x
Very cute- great job- I still have a wreath from last year up, can't decide what I want to do...and by the time it will get done it will probably be Christmas- ha ha
ReplyDeleteShannon
Stopping by from the Restless hop..
ReplyDeleteLovely wreath and tutorial! I might have to make one. The boys will enjoy getting to paint the numbers!
XOXO
Paula
realhousewifeofsingapore.blogspot.com
Thanks for sharing this wonderful tutorial at the Sunday Round Up. I love to see what you share on your blog, I'm a new follower.
ReplyDeleteRose
@ http://www.arosiesweethome.com/
This is wonderful Bethany!!!! It's really pretty!! I hope you'll link it up tonight at From Dream To Reality!!
ReplyDeleteDid you end up creating yourself a Hellocotton account? I would like to update your link to Hellocotton (Let's Have Fun - Blog Hop). Thanks :)
That is super cute!! Great job!
ReplyDeleteThank you for linking up this lovely project!!!
ReplyDeleteThis week’s linky party is up, i would love you to stop by and link up another fabulous project....
http://polkadot-pretties.blogspot.co.uk/2012/04/you-inspire-linky-party_21.html
Claire x
It's such a beautiful wreath!!!!
ReplyDeleteThanks so much for sharing at The DIY Dreamer.. From Dream To Reality!
This comment has been removed by a blog administrator.
ReplyDelete